Quantcast
Channel: Hosting Controller – System Network Programming Solution
Viewing all 187 articles
Browse latest View live

How to assign a dedicated IP to a Sub-domain OR Add-on/Park domain?

$
0
0

By default, cPanel allows one IP per account, however, in case you wish to assign multiple IPs to an account, say for a sub-domain, you can do so by editing a few files. Follow the below steps:

1) The main configuration file of a domain is stored under the /var/cpanel/userdata/<username>/ directory, so edit the subdomain related file under it

# vi /var/cpanel/userdata/<username>/subdomain.domain.tld

Change the value of “IP” to a dedicated IP and save the file. The add-on and Park domains have their related subdomain files in the same directory.

2) Once the above changes are made, you need to rebuild the Apache configuration for the changes to take affect in the respective VirtualHost entry and restart the Apache service

# /scripts/rebuildhttpdconf # service httpd restart 

3) To mark the dedicated IP as “used”, edit the file /etc/domainips and enter the sub-domain entry

<dedicated ip>: subdomain.domain.tld

Save the file and rebuild the IP pool

# /scripts/rebuildippool

4) Now, edit the DNS zone file of the main domain (i.e. the domain under which the subdomain is created)

# vi /var/named/domain.tld.db

and set the A record of the sub-domain to point to the new IP. Save the file and restart the ‘named’ service

# service named restart

That’s it.

Note: Rebuilding the IP pool will still list the IP as free under the WHM -> IP Function -> ‘Show IP Address Usage’, however WHM wont allow you to assign that IP to another domain.


Monitor outgoing emails in cPanel exim

$
0
0

In cPanel WHM, Main > Service Configuration > Exim Configuration Editor:

Under Filters, check “System Filter File” location, usually at “/etc/cpanel_exim_system_filter”.


Edit the file:

Just below (this should already exist):

if not first_delivery
then
finish
endif

Add the filter:

# Monitor outgoing emails from domain.tld
if first_delivery
and ("$h_from:" contains "@domain.tld")
and ("$h_from:" does not contain "youremail@")
then
unseen deliver "monitor@domain.tld"
endif

Save changes and restart exim:

# /etc/init.d/exim restart

If you need to monitor both outgoing and incoming emails:

# Monitor both incoming and outgoing emails.
if first_delivery
and ("$h_to:, $h_cc:" contains "@domain.tld")
or ("$h_from:" contains "@domain.tld")
and ("$h_to:, $h_cc:, $h_from:" does not contain "youremail@")
then
unseen deliver "monitor@domain.tld"
endif

This will silently forward all mails except yours’ to the monitoring email address provided.

Note: You should probably create a custom filter file like “/etc/cpanel_exim_system_filter_custom”, otherwise cPanel updates will overwrite the changes.

Howto: Disable MailMan

$
0
0

To disable Mailman on a cPanel server, remove the execute permissions of the mailman wrapper

chmod -x /usr/local/cpanel/3rdparty/mailman/mail/wrapper

If you ever want to enable it:

chmod +x /usr/local/cpanel/3rdparty/mailman/mail/wrapper

Install SSL certificate for Plesk

$
0
0

SwSoft install it’s own certificate during Plesk installation but because it’s a self-signed certificate it gives you a warning message while accessing Plesk control panel. If you wish, you can purchase your own SSL certificate and replace it with the default certificate.

Issue your new SSL certificate using the server hostname say ‘server.yourdomain.com’ and place it under the configuration directory of Plesk located at “/usr/local/psa/admin/conf/“.
The default certificate is named as “httpsd.pem”.
Name the new certificate as “httpsd-new.pem” and place it under the same configuration directory.
Edit the Plesk configuration file “httpsd.conf” and search for the following line:

SSLCertificateFile “/usr/local/psa/admin/conf/httpsd.pem”

replace it with

SSLCertificateFile “/usr/local/psa/admin/conf/httpsd-new.pem”

Save the file and restart the ‘psa’ service:

service psa stop
service psa start

Once done, access Plesk using the hostname as https://server.yourdomain.com:8443. This will make sure you won’t receive a warning message while accessing Plesk control panel.

How to increase mail size in exim

$
0
0

You may receive a bounce back message saying “Message size exceeds maximum permitted” on sending an email greater than the size defined in the exim configuration. On a cPanel server, the message size limit is 50MB by default.

In order to raise the message size limit, you need to edit the exim configuration file either manually located at /etc/exim.conf OR from WHM >> Exim Configuration Editor > Advanced Mode and at the very start of the file, add the following line:

message_size_limit = 100

Save the file and restart the exim service.

# service exim restart

This will increase the message size to 100MB. You can verify the new size by executing the following command:

# exim -bP | grep message_size_limit

Incoming search terms:

How to protect/secure php.ini with SuPHP?

$
0
0

When Apache is compiled as CGI/SuPHP, it allows users to create their own php.ini file under their home directory and modify the php values as per their wish. This may increase security concerns on the server and hence to protect/secure php.ini in SuPHP enabled servers, force every user to use a common php.ini file.

This can be achieved by defining the path of php.ini using suPHP_ConfigPath. To force users to use existing server side php.ini file, create suphp_configpath.conf

# pico /usr/local/apache/conf/userdata/suphp_configpath.conf

and add the following lines

#just specify the path to the php.ini file directory
<IfModule mod_suphp.c>
<Location />
suPHP_ConfigPath /usr/local/lib/
</Location>
</IfModule>

Once done, save the file and rebuild the Apache configuration so it picks up the changes.

# /usr/local/cpanel/bin/apache_conf_distiller –update –main
# /usr/local/cpanel/bin/build_apache_conf

To verify the include files, execute:

/scripts/verify_vhost_includes

It will display the path to the .conf file you created. Restart the Apache service once

/scripts/restartsrv httpd

This will ensure all the users use the server side php configuration file. If you wish to keep the php.ini elsewhere, just change the value of “suPHP_ConfigPath” and follow the above steps.

DirectAdmin change IP problems

$
0
0

Q: I had to re-IP a server, as transferring to a new carrier. Followed the DA instructions to convert to new server IP. No errors were noted. When gone into admin found that the old IPs where still in DA and cannot delete them. Also the new server IP was not in the “IP Manager”. All the rest of the IPs were placed into the manager with the Old IPs still visible tried again to delete without success. Tried to re-install new server IP came up message that the old IPs were the server IP and that it would not be installed. Any solutions to this problem? Advice would be appreciated.

R: If they’re out of the admin section, they’d probably still be in Reseller ip.list files.

Just remove them from the /usr/local/directadmin/data/users/*/user_ip.list file.

Where * are all of your resellers and admins.

HowTo: retrieve email account passwords

$
0
0

To retrieve email account passwords on a Plesk server, connect to the mysql prompt of your server

#mysql -uadmin -p`cat /etc/psa/.psa.shadow`

At the mysql prompt, goto the ‘psa’ database which is used by Plesk.

mysql> use psa;

and execute the following command to retrieve passwords of all the email accounts on a domain


mysql> select mail_name, password from domains, mail, accounts where domains.name=’domainname.com’ and domains.id=mail.dom_id and mail.id=accounts.id;


where, domains, mail, accounts are the tables where different entries of an email account is stored.


problem downgrade apache 2.2 to 2.0

$
0
0

E: API module structure ‘suphp_module’ in file /usr/lib/apache/mod_suphp.so is garbled – expected signature 41503230 but saw 41503232 – perhaps this is not an Apache module DSO, or was compiled for a different Apache version?
R:

cd /usr/local/directadmin/custombuild
./build suphp

If still problem you can:

cd /usr/local/directadmin/custombuild
./build php y

[HOW-TO] Use “mod_fastcgi_handler + PHP-FPM” instead of “mod_fastcgi + PHP-FPM” (Less code to work on)

$
0
0

I have read about mod_fastcgi_handler which I think it will help me to write less code to work on PHP-FPM. Checked their website, even they say it’s beta quality and there are a couple bugs. I still think I should try it. So, below is what I did to replace mod_fastcgi with mod_fastcgi_handler.

1. Put the command below into the SSH.

wget https://github.com/hollow/mod_fastcgi_handler/tarball/master --no-check-certificate
tar xvfz hollow-mod_fastcgi_handler-v0.4-0-g8973a51.tar.gz
cd hollow-mod_fastcgi_handler-8973a51
apxs -i -a -o mod_fastcgi_handler.so -c *.c

2 .Check /etc/httpd/conf/httpd.conf if mod_fastcgi_handler.so is there or not. (It should already be there after compile.)

2.1 Open httpd.conf

nano -w /etc/httpd/conf/httpd.conf
2.2 Check if there is a line below :
LoadModule fastcgi_handler_module /usr/lib/apache/mod_fastcgi_handler.so

3. Then, just edit httpd.conf per user to have the code below : (Let’s say the user is ADMIN.)

3.1 Edit httpd.conf per user :

nano -w /usr/local/directadmin/data/users/admin/httpd.conf

3.2 Put the code below: Comment out anything else. (Anything related to mod_fcgid, mod_fastcgi)

<IfModule mod_fastcgi_handler.c>
        <Files ~ (\.php)>
               SetHandler fcgi:/fcgi/admin/public_html/admin.sock
        </Files>
</IfModule>

After put that code it, the entire Virtualhost will look like below :

<VirtualHost xxx.xxx.xxx.xxx:80 >
        ServerName www.bxtra.net
        ServerAlias www.bxtra.net bxtra.net
        ServerAdmin webmaster@bxtra.net
        DocumentRoot /home/admin/domains/bxtra.net/public_html
        ScriptAlias /cgi-bin/ /home/admin/domains/bxtra.net/public_html/cgi-bin/

        UseCanonicalName OFF

        SuexecUserGroup admin admin
        CustomLog /var/log/httpd/domains/bxtra.net.bytes bytes
        CustomLog /var/log/httpd/domains/bxtra.net.log combined
        ErrorLog /var/log/httpd/domains/bxtra.net.error.log

        <Directory /home/admin/domains/bxtra.net/public_html>
                Options +Includes -Indexes
                <IfModule mod_fastcgi_handler.c>
                    <Files ~ (\.php)>
                         SetHandler fcgi:/fcgi/admin/public_html/admin.sock
                    </Files>
                </IfModule>
        </Directory>
</VirtualHost>

You can see that the code is a lot less than before. Also note that, any configuration in “/etc/httpd/conf/extra/httpd-info.conf
” that I have shown you about mod_fastcgi in previous tutorial. You can ignore it. No need to do that anymore.

Tested with below software :
1. CentOS 5.4 / 5.5 – 64 bits
2. DirectAdmin 1.37 – With Custombuild 1.2
3. Apache 2.2.17 – Worker MPM
4. PHP 5.3.5 + PHP-FPM
5. mod_fastcgi_handler 0.4
6. APC 3.1.7

Note :
After tested it for a few hours, I found it’s unstable. I sometime got AHAH error when uploading image. Sometime when saved setting, I got “Error 302 Moved Temporarily” like below :

Moved Temporarily

The server encountered an internal error or misconfiguration and was unable to complete your request.

Please contact the server administrator, webmaster@bxtra.net and inform them of the time the error occurred, and anything you might have done that may have caused the error.

More information about this error may be available in the server error log.

Additionally, a 500 Internal Server Error error was encountered while trying to use an ErrorDocument to handle the request.

For now, I have to switch back to use mod_fastcgi + PHP-FPM. So, do it at your own risk icon smile [HOW TO] Use mod fastcgi handler + PHP FPM instead of mod fastcgi + PHP FPM (Less code to work on)

How to access psa database in Plesk?

$
0
0

Plesk uses a ‘psa’ database to store all the data and values. This data can be easily retrieved at any point of time using the Mysql queries.

How to access the psa database in Plesk?
There are 2 ways to access the Plesk psa database, from the Linux command line (via ssh) and from the Plesk control panel.

Method 1) To access the psa database from command line:

SSH to your server as root. and execute the mysql command. The /etc/psa/.psa.shadow file contains the Plesk admin password.

# mysql -uadmin -p`cat /etc/psa/.psa.shadow`

You will be taken to the Mysql prompt. To switch to the psa database, execute,

mysql> use psa;

You are now in the psa database and can view all the tables

mysql> show tables;

Method 2) From the Plesk control panel.

Login to Plesk as user ‘admin’ and password from /etc/psa/.psa.shadow file.

Click "Settings" >> "Database Hosting Preferences" >> click OK >> "Local MySQL server" >> "Databases" tab >> "Webadmin".

Once you click “Webadmin”, phpMyAdmin will open in a new window from where you can access all the databases including the ‘psa’ database. Make sure pop-ups are enabled in your browser.

Error: Unable to create the domain because a DNS record exists

$
0
0

Error:

Error message “Error: Unable to create the domain example.com because a DNS record pointing to the host example.com already exists.”

The error message is displayed when you add a domain from Plesk control panel and it fails. The reason it fails is because the DNS records of the domain already exist in the psa database. The tables dns_recs and dns_zone holds the DNS records for a domain.

In order to add the domain example.com, you will have to remove the DNS entries from the tables dns_recs and dns_zone.

1) Goto Mysql prompt:

root@host [~]# mysql -uadmin -p `cat /etc/psa/.psa.shadow`

2) Use the psa database

mysql>  use psa;

3) Remove the DNS entries from the dns_recs and dns_zone tables:

mysql> delete from dns_recs where dns_zone_id=10;
mysql> delete from dns_zone where id=10;

where, 10 is the dns_zone_id of the domain example.com.

4) Restart the mysql service:

root@host [~]# service mysqld restart

You should now be able to add the domain from Plesk control panel successfully.

How to generate a full backup of an account/domain from cPanel?

$
0
0

You can perform a full backup of your account/domain from cPanel >> “Backups” option under the Files section. The full cPanel backup is very useful when migrating an account from one server to another.

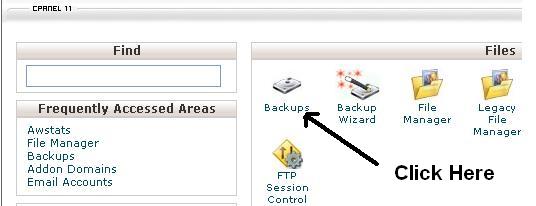
1) Login to cPanel at http://yourdomainname.tld:2082 click the “Backups” option as shown in the screen below

 How to generate a full backup of an account/domain from cPanel?

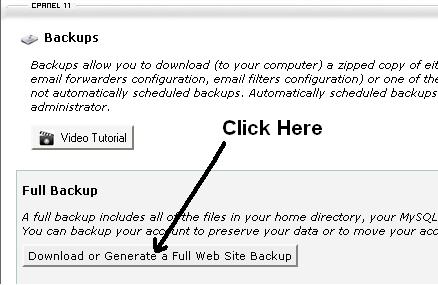
2) On the next screen, cPanel will offer you various option to generate a full backup, i.e. to backup a home directory, databases, emails etc. Click on “Download or Generate a Full Website Backup” as shown in the following screen.

 How to generate a full backup of an account/domain from cPanel?

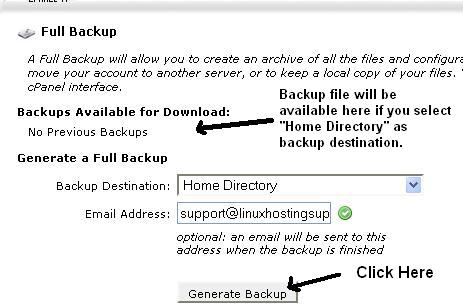
3) Here you will have to decide where you need to save the copy of the backup file by selecting the appropriate option from the “Backup Destination” drop down list.

a) “Home Directory” to keep the backup under your home directory itself i.e. /home/username. Click “Generate Backup” button to start the backup process and the backup file will be visible on the same screen once the process completes.

 How to generate a full backup of an account/domain from cPanel?

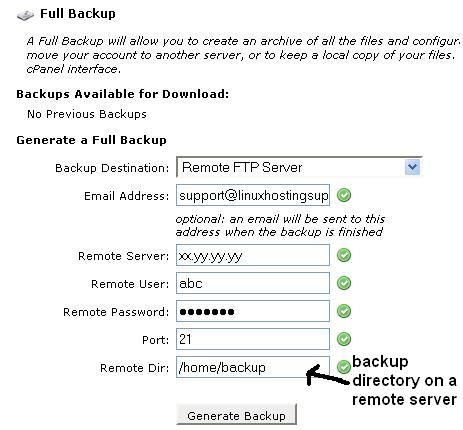
b) “Remote Ftp Server” if you want to send the backup file to a remote server in which case, you need to mention the Remote Server IP, Ftp user/password, port and directory. Click “Generate Backup” button and the backup file will be copied to the remote server once the process completes.

 How to generate a full backup of an account/domain from cPanel?

In either of the above case, you can specify an email address in the “Email Address” field to receive a notification.

Note: This cPanel generated backup cannot be restored from the cPanel interface. It can only be restored from shell as root OR from WHM interface.

How to install and configure APC cache on a cPanel server?

$
0
0

For a plain Linux server, follow: How to install APC cache on a Linux server?

Installation of APC cache on a cPanel server is pretty easy. Follow the below steps to install APC cache on cPanel server:

1. SSH to the server and execute:

# yum install pcre-devel

2. Goto WHM –> PHP Configuration Editor –> Advanced Mode, change the  “extension_dir” value from

/usr/local/lib/php/extensions/no-debug-non-zts-20060613
to
/usr/lib/php/extensions/no-debug-non-zts-20060613

3. Install APC cache from WHM.

WHM --> Module Installers --> click Manage next to "PHP Pecl".
Search APC and install it.

4. Change PHP Handler to DSO. You can either do this from WHM OR via SSH:

WHM --> Service Configuration --> Apache Configuration -->
Configure PHP and SuExec --> PHP5 Handler
OR
# /usr/local/cpanel/bin/rebuild_phpconf 5 0 dso 1

Once done, make sure apc.so file is present in the /usr/lib/php/extensions/no-debug-non-zts-20060613 directory. Sometimes it is created in the original directory and you have to create a symlink.

# ln -s /usr/local/lib/php/extensions/no-debug-non-zts-20060613/apc.so \
 /usr/lib/php/extensions/no-debug-non-zts-20060613/apc.so

Restart the Apache webserver and to confirm if APC is activated, execute:

# php -i | grep apc

How to fix Error: Set default component failed: defpackagemng failed: Execute dnsmng.exe REMOVE * failed: Execute dnsmng.exe UPDATE * failed

$
0
0

Q: I installed Plesk 9.5.2 on a Windows Server 2008 R2 Standard Edition environment.
At beginning, all was working fine with Microsoft DNS 6.1.
The problem arise when we installed Microsoft .NET 4.0.
After that, Microsoft DNS integration with Plesk Control Panel stopped working due an error on dnsmng.exe.
As a workaround, we switched to BIND DNS.

When we try to switch back to DNS we receive the following error:

Error: Set default component failed: defpackagemng failed: Execute dnsmng.exe REMOVE * failed:
Execute dnsmng.exe UPDATE * failed:

We got same problem on a server running Windows Server 2003 and Microsoft DNS 5.

It seems to be some kind of inconsitency with .NET Framework or something.


A: The issue is caused by the installation of MS update KB976576. This update updates libraries that are used by MSDNS.

A hotfix can be applied on Parallels Plesk Panel versions 8.6, 9.0 to 9.3, and 9.5.

Before applying the fix, you need to install the latest Microsoft Visual C++ 2005 Redistributable Package ATL Security Update (vcredist_x86.exe) from
http://www.microsoft.com/downloads/details.aspx?familyid=766a6af7-ec73-40ff-b072-9112bab119c2&displaylang=en

and back up the original file.

Fix for Parallels Plesk Panel version 8.6:
Replace the file “%plesk_bin%\MsProv.dll” with the file MsPRov.dll from the attachment.

Fix for Parallels Plesk Panel version 9.0-9.3:
Replace the file “%plesk_bin%\MsProv.dll” with the file MsPRov.dll from the attachment.

Fix for Parallels Plesk Panel version 9.5:
Replace the file “%plesk_bin%\MsProv.dll” with the file MsPRov.dll from the attachment.

Once complete, verify that you can perform domain operations and manage DNS records.

Additional information

%plesk_bin% is an environment variable which points to the Parallels Plesk binaries folder. Usually, it is located here: C:\Program files\Parallels\Plesk\admin\bin.

Attachments:


How to enable SpamAssassin on your server

$
0
0

To enable Spamassassin on your server, you need to first need to install it.  Once installed a few minor changes are needed in your /etc/exim.conf file.

1) Install spamd and spamc:

cd /usr/local/directadmin/scripts
./spam.sh

If you get errors building spamd relating to missing perl modules, try using cpan to install them:

export PERL_EXTUTILS_AUTOINSTALL="--defaultdeps"
cpan -i Archive::Tar Digest::SHA Mail::SPF IP::Country Net::Ident IO::Socket::INET6 Compress::Zlib Mail::DKIM LWP::UserAgent HTTP::Date Encode::Detect ExtUtils::MakeMaker NetAddr::IP Mail::SpamAssassin::Plugin::Razor2 Razor2::Client::Agent IO::Socket::SSL DBI

and then run the spam.sh again.

If it asks you:

Are you ready for manual configuration? [yes] no

be sure to type “no” and press enter.  Only use “yes” if you really know what you’re doing.  The default options are going to be the most reliable.

If after cpan has been used and the setup is complete (download servers/options, etc), you may need to use this as well if you don’t wish to sit around and answer “y” to all of the “prepend to list” questions:

export PERL_MM_USE_DEFAULT=1

However, if you have never run cpan before, so do not set the PERL_MM_USE_DEFAULT=1 option, or else it will get you stuck in a loop for some of the config options.
Also Related (/etc/perl/CPAN/Config.pm):

[server]# cpan
cpan> o conf prerequisites_policy follow
cpan> o conf commit

Or, as an alternative to using cpan, CentOS boxes can use this:

yum -y install perl-ExtUtils-MakeMaker perl-Digest-SHA perl-Net-DNS perl-NetAddr-IP perl-Archive-Tar perl-IO-Zlib perl-Digest-SHA perl-Mail-SPF perl-IP-Country perl-Razor2 perl-Net-Ident perl-IO-Socket-INET6 perl-IO-Socket-SSL perl-Mail-DKIM perl-DBI perl-Encode-Detect

2) Start the spamd:

/usr/bin/spamd -d -c -m 15

3) In order to get exim to use the spamd program, you’ll need to make some changes in your /etc/exim.conf.  Change:

# Spam Assassin
#spamcheck_director:
#  driver = accept
#  condition = "${if and { \
#      {!def:h_X-Spam-Flag:}  \
#      {!eq {$received_protocol}{spam-scanned}}  \
#      {!eq {$received_protocol}{local}}  \
#      {exists{/home/${lookup{$domain}lsearch{/etc/virtual/domainowners}{$value}}/.spamassassin/user_prefs}}  \
#      {<{$message_size}{100k}} \
#    } {1}{0}}"
#  retry_use_local_part
#  transport = spamcheck
#  no_verify

to

# Spam Assassin
spamcheck_director:
driver = accept
condition = "${if and {  \
{!def:h_X-Spam-Flag:}  \
{!eq {$received_protocol}{spam-scanned}}  \
{!eq {$received_protocol}{local}}  \
{exists{/home/${lookup{$domain}lsearch{/etc/virtual/domainowners}{$value}}/.spamassassin/user_prefs}}  \
{<{$message_size}{100k}} \
} {1}{0}}"
retry_use_local_part
transport = spamcheck
no_verify

4) Restart exim:
Redhat:

/sbin/service exim restart

FreeBSD:

/usr/local/etc/rc.d/exim restart

The global spamassassin config file is in /etc/mail/spamassassin/local.cf

If you run debian and are missing perl or some pm files, type:

apt-get install perl-base perl-modules

Manual Installation of Nginx in Cpanel Apache in proxy mode

$
0
0

1. In order to get the cPanel server ready for nginx – you must first install an apache module called mod_rpaf

Login as root:
# cd /usr/local/src
# wget http://stderr.net/apache/rpaf/download/mod_rpaf-0.6.tar.gz
# tar xvzf mod_rpaf-0.6.tar.gz
# cd mod_rpaf-0.6
# /usr/local/apache/bin/apxs -i -c -n mod_rpaf-2.0.so mod_rpaf-2.0.c

2. Doing so will install the module into the Apache module directory.

Then Go to your  Web Host Manager (WHM) follow the tree here:
Main >> Service Configuration >> Apache Configuration > Include Editor > Pre Main Include and Select the apache version that is running on your cPanel server. and then add following code section there, and replace (place your ips here without the brakets) with the list of IP addresses on your Cpanel server:

==================================================
LoadModule rpaf_module modules/mod_rpaf-2.0.so

RPAFenable On
# Enable reverse proxy add forward

RPAFproxy_ips 127.0.0.1  (place all your ips here without the brakets)

RPAFsethostname On
# let rpaf update vhost settings allowing to have
# the same hostnames as in the “actual” configuration for the
# forwarding apache installation

RPAFheader X-Real-IP
# Allows you to change which header we have mod_rpaf looking for
# when trying to find the ip the that is forwarding our requests
===================================================

3. Once this is completed – we are ready to move Apache to another port. To move the apache to another port follow the below:

Go to your WHM  >> “tweak settings”  and change the apache port from 80 to 81 (find 0.0.0.0:80 and change it to 0.0.0.0.:81)

4. Do the following

# /usr/local/cpanel/whostmgr/bin/whostmgr2 –updatetweaksettings

5. Check your “/usr/local/apache/conf/httpd.conf”  for any occurrences of port 80,
#  vi /usr/local/apache/conf/httpd.conf

Find for port 80 if you found any occurrences of port 80 then rebuild your apache configuration file by running
# /scripts/rebuildhttpdconf   and make sure your httpd.conf file is up to date

6. Then run
# /etc/init.d/httpd restart

7. Now install Nginx. You must install pcre library in order to install Nginx on your cPanel server:

# wget ftp://ftp.csx.cam.ac.uk/pub/software/programming/pcre/pcre-7.9.tar.gz
# tar xvzf pcre-7.9.tar.gz
# cd pcre-7.9
# ./configure
# make
# make install

Now Install Nginx

#wget http://sysoev.ru/nginx/nginx-0.7.63.tar.gz
# tar xvzf nginx-0.7.63.tar.gz
# cd nginx-0.7.63
# ./configure
# make
# make install

9. Create nginx.sh file and put the below code section to the file :

# vi  nginx.sh
===================================================================
#!/bin/sh

cat > “/usr/local/nginx/conf/nginx.conf” <<EOF
user  nobody;
# no need for more workers in the proxy mode
worker_processes  2;

error_log  logs/error.log info;

worker_rlimit_nofile  8192;

events {
worker_connections  1024; # you might need to increase this setting for busy servers
use epoll; #  Linux kernels 2.6.x change to epoll
}

http {
server_names_hash_max_size 2048;

include    mime.types;
default_type  application/octet-stream;

sendfile on;
tcp_nopush on;
tcp_nodelay on;

keepalive_timeout  10;

gzip on;
gzip_min_length  1100;
gzip_buffers  4 32k;
gzip_types    text/plain application/x-javascript text/xml text/css;
ignore_invalid_headers on;

client_header_timeout  3m;
client_body_timeout 3m;
send_timeout     3m;
connection_pool_size  256;
client_header_buffer_size 4k;
large_client_header_buffers 4 32k;
request_pool_size  4k;
output_buffers   4 32k;
postpone_output  1460;

include “/usr/local/nginx/conf/vhost.conf”;
}

EOF

/bin/cp /dev/null /usr/local/nginx/conf/vhost.conf

cd /var/cpanel/users
for USER in *; do
for DOMAIN in `cat $USER | grep ^DNS | cut -d= -f2`; do
IP=`cat $USER|grep ^IP|cut -d= -f2`;
ROOT=`grep ^$USER: /etc/passwd|cut -d: -f6`;
echo “Converting $DOMAIN for $USER”;

cat >> “/usr/local/nginx/conf/vhost.conf” <<EOF
server {
access_log off;

error_log  logs/vhost-error_log warn;
listen    80;
server_name  $DOMAIN www.$DOMAIN;

location ~* \.(gif|jpg|jpeg|png|ico|wmv|3gp|avi|mpg|mpeg|mp4|flv|mp3|mid|js|css|html|htm|wml)$ {
root   $ROOT/public_html;
}

location / {
client_max_body_size    10m;
client_body_buffer_size 128k;

proxy_send_timeout   90;
proxy_read_timeout   90;

proxy_buffer_size    4k;
# you can increase proxy_buffers here to suppress “an upstream response
#  is buffered to a temporary file” warning
proxy_buffers     16 32k;
proxy_busy_buffers_size 64k;
proxy_temp_file_write_size 64k;

proxy_connect_timeout 30s;

proxy_redirect  http://www.$DOMAIN:81   http://www.$DOMAIN;
proxy_redirect  http://$DOMAIN:81   http://$DOMAIN;

proxy_pass   http://$IP:81/;

proxy_set_header   Host   \$host;
proxy_set_header   X-Real-IP  \$remote_addr;
proxy_set_header   X-Forwarded-For \$proxy_add_x_forwarded_for;
}
}
EOF
done
done
===================================================================================

8. Save the file and change the permision and then run :
# chmod 755 nginx.sh
# sh nginx.sh

9. Now Check the  Nginx configuration
#/usr/local/nginx/sbin/nginx -t

=============================
Great install instructions, everything worked fine just some additional info if you get error like  invalid event type “rtsig” when you run this commmand: # /usr/local/nginx/sbin/nginx -t

To correct this error you should do this: vi /usr/local/nginx/conf/nginx.conf
Find line 11 and change “rtsig” to “epoll” .

This error occures in case your server is using kernel 2.4.x
===============================

10. Restart Nginx
# /usr/local/nginx/sbin/nginx

11. create init script

# vi /etc/init.d/nginx
And put the below code section to the file:
========================================================================
#!/bin/sh
#
# nginx – this script starts and stops the nginx daemin
# Taken from http://www.hikaro.com
# chkconfig:   – 85 15
# description:  Nginx is an HTTP(S) server, HTTP(S) reverse \
#               proxy and IMAP/POP3 proxy server
# processname: nginx
# config:      /usr/local/nginx/conf/nginx.conf
# pidfile:     /usr/local/nginx/logs/nginx.pid

# Source function library.
. /etc/rc.d/init.d/functions

# Source networking configuration.
. /etc/sysconfig/network

# Check that networking is up.
[ "$NETWORKING" = "no" ] && exit 0

nginx=”/usr/local/nginx/sbin/nginx”
prog=$(basename $nginx)

NGINX_CONF_FILE=”/usr/local/nginx/conf/nginx.conf”

lockfile=/var/lock/subsys/nginx

start() {
[ -x $nginx ] || exit 5
[ -f $NGINX_CONF_FILE ] || exit 6
echo -n $”Starting $prog: ”
daemon $nginx -c $NGINX_CONF_FILE
retval=$?
echo
[ $retval -eq 0 ] && touch $lockfile
return $retval
}

stop() {
echo -n $”Stopping $prog: ”
killproc $prog -QUIT
retval=$?
echo
[ $retval -eq 0 ] && rm -f $lockfile
return $retval
}

restart() {
configtest || return $?
stop
start
}

reload() {
configtest || return $?
echo -n $”Reloading $prog: ”
killproc $nginx -HUP
RETVAL=$?
echo
}

force_reload() {
restart
}

configtest() {
$nginx -t -c $NGINX_CONF_FILE
}

rh_status() {
status $prog
}

rh_status_q() {
rh_status >/dev/null 2>&1
}

case “$1″ in
start)
rh_status_q && exit 0
$1
;;
stop)
rh_status_q || exit 0
$1
;;
restart|configtest)
$1
;;
reload)
rh_status_q || exit 7
$1
;;
force-reload)
force_reload
;;
status)
rh_status
;;
condrestart|try-restart)
rh_status_q || exit 0
;;
*)
echo $”Usage: $0 {start|stop|status|restart|condrestart|try-restart|reload|force-reload|configtest}”
exit 2
esac

========================================================================================

11. save the code and execute
# chmod +x /etc/init.d/nginx

12. make it start when the server run
# /sbin/chkconfig nginx on

13.You can run following command to check if its running:

# service nginx start
# service nginx stop
# service nginx restart
# service nginx reload
# service nginx configtest
# service nginx status

14. To Create an automatic virtualhost entry in nginx virtualhost configuration  (/usr/local/nginx/conf/vhost.conf)  when cPanel account get created on the server follow the below instructions:

Go to the cPanel script that is :

# vi /scripts/postwwwacct
# chmod 755 /scripts/postwwwacct

and put the same code that is used in “nginx.sh” in the step 9 and it will create an virtualhost entry to the nginx.
15.To remove virtualhost entry from nginx virtualhost configuration (/usr/local/nginx/conf/vhost.conf)  when cPanel account get terminated from the server follow the below instructions:

Go to the cPanel script that is :

# vi /scripts/postwkillacct
# chmod 755 /scripts/postwkillacct

and put the same code that is used in “nginx.sh” in the step 9 and it will create an virtualhost entry to the nginx.
Install ImageMagick and Imagick on Cpanel Server

$
0
0

Here’s a quick how-to for installing ImageMagick and Imagick on Cpanel server. I will cover only the procedure using the Cpanel built-in scripts, although you can also install it the usual way (rpm or source install). ImageMagick is the application for working with images while the Imagick is a PHP extention to modify/create images using the ImageMagick API.

Installation:

ImageMagick
Check first if it’s installed:
/scripts/checkimagemagick
Proceed with Installation:
/scripts/installimagemagick
Installation will take a couple minutes as it will install other packages needed by ImageMagick. After the installation, you can check your ImageMagick version:
/usr/bin/convert --version
It will give you something like:
Version: ImageMagick 6.4.8 2009-05-11 Q16 OpenMP http://www.imagemagick.org
Copyright: Copyright (C) 1999-2009 ImageMagick Studio LLC

Imagick
Go to WHM -> Software -> Module Installers -> PHP Pecl (manage). On the box below “Install a PHP Pecl” enter “imagick” and click “Install Now” button – that’s all.

Restart Apache and check your phpinfo page to see the details of Imagick and ImageMagick as well. See linked images for reference: image1, image2.

Uninstall:

If you decide to uninstall it’s as easy as the installation process:
ImageMagick: /scripts/cleanimagemagick
Imagick: WHM -> Software -> Module Installers -> PHP Pecl (manage). Click on Uninstall button for Imagick.

Failed domain creation: Unable to update domain data

$
0
0

You may come across the “Failed domain creation” error message while adding a domain from the Plesk control panel.

Failed domain creation: Unable to update domain data: Failed setting of domain parameters: Cannot change Webmail on domain: webmail
0: DomainPropertiesUIPointer.php:267
DomainPropertiesUIPointer->accessItem_create(string ‘POST’)
1: DomainPropertiesUIPointer.php:59
DomainPropertiesUIPointer->accessItem(string ‘POST’, NULL null)
2: UIPointer.php:596
UIPointer->access(string ‘POST’)
3: plesk.php:38

The fix provided across the internet is to install the psa-hotfix3 but it doesn’t work. In order to resolve the Plesk domain creation issue, run the autoinstaller in order to upgrade the installed components. The autoinstaller is use to install the new components offered by Plesk OR to upgrade the existing ones.

/usr/local/psa/admin/sbin/autoinstaller –select-release-current –upgrade-installed-components –debug

Incoming search terms:

How to Delete All admin Messages from Directadmin

$
0
0

If your Directadmin server faces a brute-force attack or script-kiddies are trying to guess your password, your message queue is full of messages. If you don’t check them periodically, you will have some problems deleting them.

I have been away for 2 weeks so I didn’t check my server for messages. When I came back, there were 2600 messages, and any attempt to list them all was unsuccessful. Since I know my users aren’t using the Directadmin Message system, it was safe to delete them.

In order to do this, you need to go to /usr/local/directadmin/data/tickets . You will see some folders there. These folders are full of messages, that are safe to delete. In order to find out, which folders you need to delete, you need to check /usr/local/directadmin/data/admin/tickets.list. When you see the list of messages, you may delete those you don’t need.

That’s pretty simple, and you may use this method for any other reseller. Just replace admin with your reseller name and check its message list.

Viewing all 187 articles
Browse latest View live